Showing posts with label DIY. Show all posts

Thursday, July 31, 2014

DIY Traveling Art Supplies Book

Art Supplies Book To Go:


My 5 year old loves creating, coloring, tracing, drawing, you name it; we go through paper so fast in this house it's ridiculous. As my husband and I were gearing up for a trip with the kids, I knew we were going to need something to keep our budding artist busy while we traveled. I figured that having his stuff with him would do the trick but I didn't want to just toss all that stuff in his bag and hope for the best. I saw a bunch of different ideas on how to organize art supplies, like these from Color Wheel Meals and One Orange Giraffe 

Color Wheel Meals
One Orange Giraffe

but I know my child and after using something like this the crayons, markers and pencils would all be mixed together and dumped in the bucket, making it pointless. On top of that I wanted something that we could grab and go with as well as something he could put out of sight when not in use. I found this great notebook idea. It's an art supply notebook, good for traveling and your basic everyday organization as well. 


I bought a few items that I know he uses on a regular basis: Crayons, Markers and Pencils ($5.29)

I picked up 4 clear binder pouches that fit in a 3 ring binder ($1.88)


A spiral notebook of wide ruled paper with his favorite characters on the front ($1) and I found a random 3 ring binder in our basement (Free).


I started off by placing the different art supplies into each of the plastic pouches. This helps if you're using the notebook for basic organization, it keeps the supplies separate, neat and easy to put away.


I ripped the front and back covers off of the spiral notebook and cut the spiral fringe off so that I could use it as the cover to the binder.


I took a few pages of the spiral notebook so that he could continue practicing his letters and writing his name while we were away.


I added some plain white paper, a copy of the flash cards we've been using for him to learn his sight words, coloring pages that I printed from the internet and the rest of the lined paper. I ripped the pages out of the spiral notebook because the wire took up too much space and I really just wanted it for the Avengers cover. Here are a few shots of the final project.


Once all of the items were placed in the notebook I just made sure it wasn't too heavy for him to carry in his book bag.

You can definitely use less stuff, especially if you're traveling (8 crayons instead of 28, 2 pencil not 7) but my child doesn't listen when I say "color lightly, you're going to break the point" so we're bringing extra.

I used a small 3 ring binder so there's not tons of stuff  in it. You can get very creative with these notebooks and pouches if you use a larger 3 ring binder. Other art supplies you can stash would include:
Scissors
Glue Sticks
Pencil sharpener
Protractor/Compass
Paintbrushes
Chalk

Tuesday, January 21, 2014

Our Wiggles Birthday Party

For my son's 2nd birthday we did a Wiggles theme but the group looks very different these days. If you have a kid who's into the original group, here are some ideas for a great DIY party.

We couldn't figure what to do for a piñata until we expanded our ideas. We decided to go with Captain Feathersword and a treasure chest.

I bought a basic treasure chest from Party City and just added the Wiggles logo,which I printed off the internet, to the top and sides.

imageimage

For the rest of the decorations we just used Google images and The Wiggles colors of Red, Blue, Yellow and Purple. Here are some other party things we threw in.


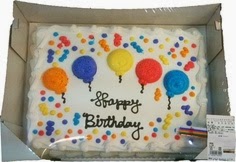
For the cake I cut out this Big Red Car with an exact-o knife and mounted it on a piece of foil. We purchased a balloon cake from Costco for $15 and asked them to write only on the two top corners, this allowed up to put the cutout in the center,


We played pin The Wiggles on the Road by making a big 2 on on foam board and cutting out more Wiggles cars for each kid.


Hope this has given you inspiration for your own party. Search  the net and pull some ideas then put your own spin on it by converting those ideas to fit your theme.
Enjoy,

Niki
 (If you'd like to read more about me visit my post on A Bit About Me). 


Monday, January 20, 2014

Bookcase Project for a Kid's Room

We were looking for a way to reduce the amount of clutter in the kid’s room so we got rid of the big bulky clothing hutch that housed their books, shoes, baby bibs and towels. Though the case could hold all of those items it wasn't visually appealing and it took up a lot of space in the room. With one trip to Ikea we purchased under bed storage for their shoes and we also found these really cool racks that we used for their books.

The shelves were actually in the kitchen area, they’re unfinished spice racks under the name BEKVÄM for $3.99 (wall anchors and screws not included)


We purchased 5 to complete this look.


The shelves took about 5 minutes per shelf to assemble but once they were all together we realized that the holes on the back were too small for the screws we had so we took a quick trip out to HomeDepot and purchased these smaller screws and anchors.


Without the trip to Home Depot, this was a 1/2 -1 hour job. The hardest part was getting the holes in the right spots and making sure the shelves were level. Once we got a system going, they were up in no time. 

The picture frames are from Ikea, they have plastic covers instead of glass so they're safer in the kid's room. The toy box was purchased last year from Ikea also.


In all we spent about $25 on the shelf project alone, if you want to paint the shelves that will run you a bit more.


Hope this gives you some inspiration for your home.

Niki
 (If you'd like to read more about me visit my post on A Bit About Me).

Friday, October 18, 2013

My Mom Bag - Modernizing the age old diaper bag

If you’re already a trendy mom or dad this post will seem like old news to you but if you’re like me and you sometimes struggle when it comes to looking “trendy” or “hip” (geez I can’t even believe I just typed that, I’m old) anyway, if you're like me then this post will be right up your alley.

I’m not big on purses, mostly because I’m afraid it won’t “go” with what I’m wearing or even worse, that I’m going to leave it somewhere. Usually when I’m out with the kids I stick my wallet and keys in our diaper bag and keep it moving but last month when I saw my husband's cousin not only “wearing” his son but also sporting his backpack stuffed with diapers, wipes and other kid stuff I thought to myself, why don't I do that?  Not the backpack per se, I'm not a backpack person, but a bag that I like and that could work double duty.

So one day while roaming the aisles at my favorite store I came across this beautiful red bag and when I opened it up I HAD to buy it, these are my favorite colors.

Zebra!!!! :)


It’s now my “mom bag”, basically a large purse that I also use as a diaper bag for quick trips when I don't need a bunch of kid stuff.


I'm able to get a good amount of stuff in this bag:
3 diapers, wipes, travel size diaper cream, teething tabs, a burp cloth, a change of pants, a magazine and all my personal stuff. Stop wondering why I have so many keys :)


This particular bag has lots of pockets to store my things separate from theirs and that comes in handy when you're trying to keep it all together. 

Little eternal zipper area for makeup, gum, etc.

Mommy's side of the bag
Kid's side of the bag

There's also a zippered area in the middle where I stash a gallon sized zip-lock bag for any dirty or wet clothes, a must.


Like I said earlier, my cousin pulled this same concept off using his book bag, so there's really no need to buy some fancy designer diaper bag system that you don't really like, you can make your own. My next bag will be a basic black so I can avoid the whole "does this match" drama, I have enough to deal with :)

Thanks for stopping by

Niki


Tuesday, October 8, 2013

A little Spray Paint Goes a Long Way

Four years ago I bought this yoga frog from Pier One and I wasn't happy with the color but I knew that could be an easy fix.


With a few coats a $3 silver metallic spray paint I created something I now love. The key to getting a good finished product is to keep your hand moving while spraying and allow each layer to dry before adding the next.


Here's the most recent photo of my final project, surrounded by my shrine to lavender :)


Thanks for stopping by. Please check out my other posts and if you'd like to read more about me visit my post on A Bit About Me :)

Niki

Monday, October 7, 2013

Halloween Costume - Pregnancy Reveal

If you're pregnant and looking for a last minute costume idea, do I have an easy one for you.

Last year when we were debating how to tell people we were expecting I found this great idea on Make It & Love It and I wore it to my nephew’s costume birthday party and again on Halloween. It ended up being a great pregnancy announcement for family members I haven’t seen in a while. I wore the baby with the boy or girl symbol above (we didn't know the sex yet) and my hubby wore the burger, fries and beer. A lot of people thought the costume was store bought and my hubby got a lot of compliments for his stencil work.


This costume is an easy last minute (1-2 day before) job because it doesn't take many supplies to pull of but it does involve some prep work and patience.

I didn't use the freezer paper as suggested in Ashley's blog due to the fact that I couldn't find any near me so I just had my hubby cut out a stencil from poster paper, which he free-handed from Ashely’s pictures. I'm sure if you Google the images you'll find a bunch that you can copy. 

I taped the stencil down with painters tape and put a piece of cardboard inside the shirt just in case the paint came threw. 

Using white fabric paint and a fabric paint brush I blotted on the first and second layer, placing it in front of a fan in between coats to speed up the drying process. After it dried I removed the tape and used a black sharpie to touch up the edges.

Ashley does a great step by step tutorial here.

Happy Halloween!

Niki
 (If you'd like to read more about me visit my post on 
A Bit About Me).